


Utilizing AWS Chatbot to Monitor and Manage CodePipelines
Get notified via Slack if builds in your pipeline have failed


AWS CodePipeline and CodeBuild are neat services for building your Continuous Integration & Delivery solution, as you don’t have to maintain servers, but can just run your build images with AWS-managed containers. As not everything is gold, one major downside is the complex & not really intuitive web interface. There’s not a single overview to highlight all jobs which are currently in a failed state over all your pipelines, so keeping an overview is difficult and tedious.
A quick and nice enhancement is the use of AWS Chatbot, which can be integrated with Slack. In this tutorial, we’ll build a solution that sends notifications about failed deployments to your slack channel of desire. Also, I’ll give some outlook on what else is possible with AWS Chatbot, like invoking Lambda functions directly.
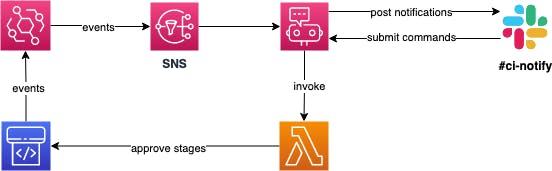
Integrating AWS Chatbot via SNS, Lambda & Slack
We’ll set up everything via Terraform & CloudFormation.
Setting up the CloudFormation Template for AWS Chatbot
As a starter, we need to define our CloudFormation template as YAML in a separate file aws_chatbot_template.yaml.
AWSTemplateFormatVersion: "2010-09-09"
Description: AWS Chatbot Configuration
Parameters:
  configurationName:
    Type: String
    Description: The name of the configuration.
  roleArn:
    Type: String
  logLevel:
    Type: String
  slackChannelId:
    Type: String
  slackWorkspaceId:
    Type: String
  snsTopicArn:
    Type: CommaDelimitedList

Resources:
  SlackChannelConfiguration:
    Type: AWS::Chatbot::SlackChannelConfiguration
    Properties:
      ConfigurationName: !Ref configurationName
      IamRoleArn: !Ref roleArn
      LoggingLevel: !Ref logLevel
      SlackChannelId: !Ref slackChannelId
      SlackWorkspaceId: !Ref slackWorkspaceId
      SnsTopicArns: !Ref snsTopicArn
Next, we can use our template and fill in our variables.
resource "aws_cloudformation_stack" "chatbot" {
  name          = "chatbot"
  template_body = data.local_file.template.content
  parameters = {
    configurationName = "chatbot"
    roleArn           = aws_iam_role.chatbot.arn
    logLevel          = "INFO"
    slackChannelId    = "CXXXXXXX"
    slackWorkspaceId  = "TXXXXXXX
    snsTopicArn       = aws_sns_topic.chatbot.arn
  }
}

data "local_file" "template" {
  filename = "${path.module}/aws_chatbot_template.yaml"
}
If you’re asking yourself how you find your Workspace & Channel ID, login into your Slack via the Web and click on your desired channel. Looking at the URL, you’ll find everything you need:
Your workspace identifier starts with T and the identifier for your channel with C.
Setting up our SNS Topic & needed Roles and Policies
Next, we’re defining our role & policies we need, which is really basic for now.
resource "aws_iam_role" "chatbot" {
  name               = "chatbot"
  assume_role_policy = data.aws_iam_policy_document.assume.json
}

data "aws_iam_policy_document" "assume" {
  version = "2012-10-17"
  statement {
    actions = [
      "sts:AssumeRole"
    ]
    principals {
      identifiers = ["chatbot.amazonaws.com"]
      type        = "Service"
    }
    effect = "Allow"
  }
}
data "aws_iam_policy_document" "chatbot" {
  statement {
    effect = "Allow"
    actions = [
      "logs:*",
    ]
    resources = ["*"]
  }
}
resource "aws_iam_policy" "chatbot" {
  name        = "chatbot"
  policy      = data.aws_iam_policy_document.chatbot.json
}

resource "aws_iam_role_policy_attachment" "chatbot" {
  role       = aws_iam_role.chatbot.name
  policy_arn = aws_iam_policy.chatbot.arn
}
Next, we’re creating our SNS topic and attaching a proper policy that allows Chatbot to execute needed actions as well as EventBridge to forward our CodePipeline events.
resource "aws_sns_topic" "chatbot" {
  name   = "slack-chatbot"
  policy = data.aws_iam_policy_document.chatbot_sns.json
}
data "aws_iam_policy_document" "chatbot_sns" {
  version   = "2012-10-17"
  policy_id = "ChatBotSns"
  statement {
    sid       = "AllowSnsPublish"
    effect    = "Allow"
    resources = ["*"]
    actions   = ["sns:Publish"]
    principals {
      identifiers = ["events.amazonaws.com"]
      type        = "Service"
    }
  }

  statement {
    sid    = "AllowSnsFullAccessOnTopic"
    effect = "Allow"
    actions = [
      "sns:GetTopicAttributes",
      "sns:SetTopicAttributes",
      "sns:AddPermission",
      "sns:RemovePermission",
      "sns:DeleteTopic",
      "sns:Subscribe",
      "sns:ListSubscriptionsByTopic",
      "sns:Publish",
      "sns:Receive"
    ]
    resources = ["arn:aws:sns:*:*:slack-chatbot"]
    principals {
      identifiers = ["*"]
      type        = "AWS"
    }
  }
}
Creating Notifications at CodePipeline
We’ve already made it almost to the end. The final step is to actually forward our target events to our SNS topic, so Chatbot can send them to Slack.
data "aws_caller_identity" "current" {}
resource "aws_codestarnotifications_notification_rule" "events" {
  for_each       = toset([
    "first-pipeline",
    "second-pipeline",
    "third-pipeline"
  ])
  detail_type    = "FULL"
  event_type_ids = [
    "codepipeline-pipeline-stage-execution-failed",
    "codepipeline-pipeline-manual-approval-succeeded",
    "codepipeline-pipeline-manual-approval-needed"
  ]

  name     = "${each.value}-codepipeline"
  resource = "arn:aws:codepipeline:eu-central-1:${data.aws_caller_identity.current.account_id}:${each.value}"

  target {
    address = aws_sns_topic.chatbot.arn
  }
}
You’re not limited to the events which I used. There are many more for CodePipeline which you can find in the AWS documentation.
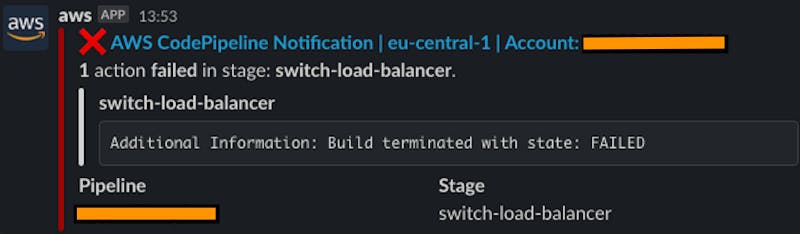
If everything works out properly, you should see notifications in your channel.
Taking it one step further: invoking Lambda functions
You can easily extend your Chatbot role with invocation rights for a new Lambda function. Afterward, you’ll be able to invoke your function in your Chat:
@aws lambda invoke --function-name $LAMBDA-NAME --region $REGION
A good use case for us is to submit approvals for outstanding production deployments. As you can grant your lambda function as many AWS API rights as you like, you can get as creative as possible!
Related Reads
If you found this article on AWS Chatbot for monitoring and managing your CodePipelines useful, you might also enjoy these related articles: